Cute Standing Dog Amigurumi Crochet Pattern
Designer: Yuliya Kovaleva
VK: @kovaleva_uliya
Difficulty Level: Intermediate
A gentle handmade puppy with a soft story to tell
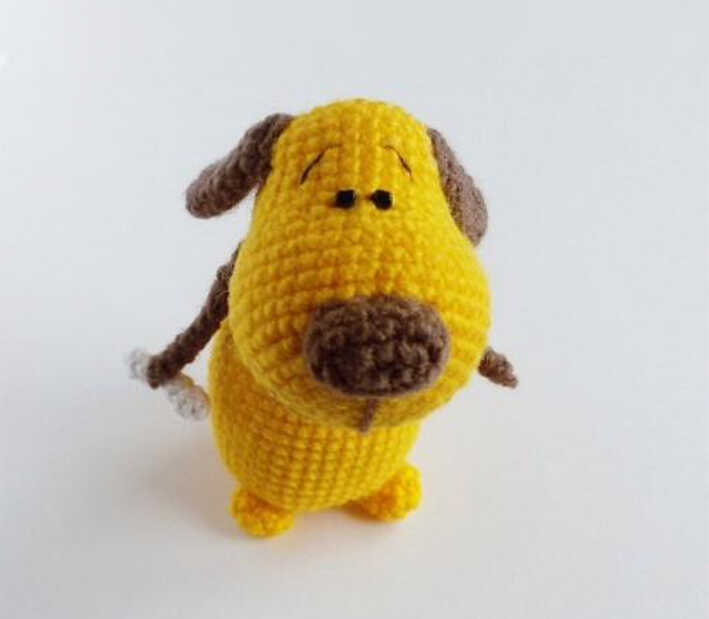
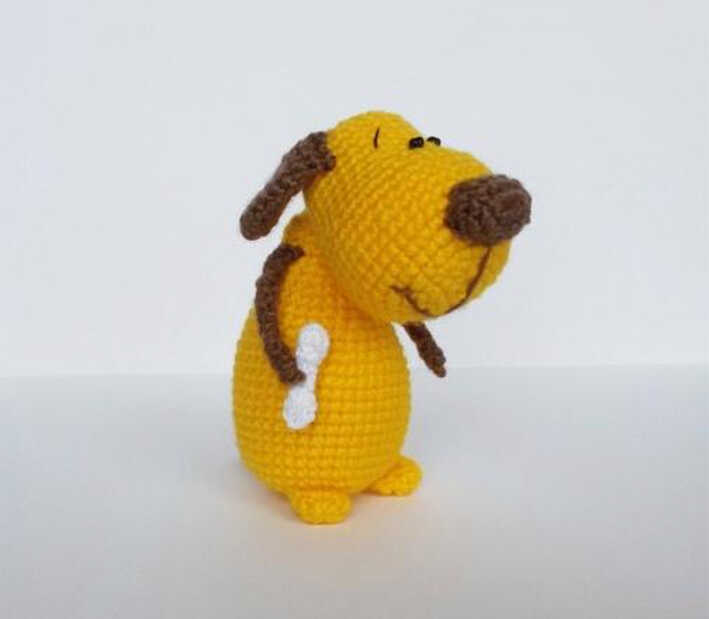
This Mini Puppy Amigurumi With Long Snout Design, designed by Yuliya Kovaleva, is inspired by the calm, loyal nature of small companion dogs and their timeless appeal. With its elongated snout and balanced proportions, it makes a lovely choice for shelves, nursery décor, or heartfelt handmade gifts. It fits naturally into DIY Crochet Gift Ideas, Easy Crochet Projects, and Low Sew or No Sew Amigurumi Patterns, making it versatile for many creative moods. The pattern also shares lovely amigurumi dog ideas at the end for extra inspiration. Many thanks to the designer for creating and sharing this thoughtful puppy design.
This project is often searched as a beginner amigurumi dog pattern, but it is best suited for Difficulty Level: Intermediate crocheters who are comfortable with shaping and stitch consistency. The instructions are written in a step by step, beginner friendly style, making the process enjoyable even if you are still learning how to crochet amigurumi. If you have been wondering how to crochet an amigurumi puppy that feels expressive yet remains approachable, this pattern is a perfect place to grow your skills. It is also a Quick to Make Amigurumi that feels satisfying from start to finish.
The design uses simple materials such as yarn in a main color, a contrasting yarn for the ears and nose, a crochet hook suitable for your yarn, fiberfill, safety eyes, and basic tools like a needle and scissors. Cotton yarn gives the puppy a clean and defined finish, while velvet yarn creates a much larger, plush version with a cozy texture—just note the size difference. If you enjoy soft and sweet animal characters, you may also like this cute lamb amigurumi for more inspiration.
Abbreviations
sc – single crochet
inc – increase
dec – decrease
ch – chain
st(s) – stitch(es)
(…) x n – repeat the instructions in parentheses n times
Materials and Tools
• Yarn in main color
• Yarn in contrasting color (ears, nose)
• Crochet hook suitable for your yarn
• Fiberfill
• Safety eyes
• Needle and scissors
FREE DOG AMIGURUMI CROCHET PATTERN
Head
R1: 6 sc in MR (6)
R2: inc x 6 (12)
R3: (1 sc, inc) x 6 (18)
R4: (2 sc, inc) x 6 (24)
R5: (3 sc, inc) x 6 (30)
R6: (4 sc, inc) x 6 (36)
R7: (5 sc, inc) x 6 (42)
R8–R12: 42 sc
R13: (5 sc, dec) x 6 (36)
R14: (4 sc, dec) x 6 (30)
R15–R20: 30 sc
R21: (3 sc, dec) x 6 (24)
R22: (2 sc, dec) x 6 (18)
R23: (1 sc, dec) x 6 (12)
R24: dec x 6 (6)
Fasten off, pull stitches tight, leave yarn for sewing.
Body
R1: 6 sc in MR (6)
R2: inc x 6 (12)
R3: (1 sc, inc) x 6 (18)
R4–R6: 18 sc
R7: (5 sc, inc) x 3 (21)
R8: (6 sc, inc) x 3 (24)
R9: (3 sc, inc) x 6 (30)
R10–R11: 30 sc
R12: (4 sc, inc) x 6 (36)
R13–R14: 36 sc
R15: (1 sc, inc) x 6, 24 sc (42)
R16–R24: 42 sc
R25: (5 sc, dec) x 6 (36)
R26: (4 sc, dec) x 6 (30)
R27: (3 sc, dec) x 6 (24)
R28: (2 sc, dec) x 6 (18)
R29: (1 sc, dec) x 6 (12)
R30: dec x 6 (6)
Fasten off and hide the yarn.
Legs (2 pieces)
R1: 6 sc in MR (6)
R2: (1 sc, inc) x 3 (9)
R3: 9 sc
R4: Fold the piece in half and crochet 4 sc through both layers. Leave yarn for sewing.
Nose
R1: Ch 5
R2: 2 sc, 3 sc in one st, 2 sc, 2 sc in one st (10)
R3: 2 sc, inc x 3, 2 sc, inc x 3 (16)
R4: 16 sc
Leave yarn for sewing.
Ears (2 pieces)
R1: 6 sc in MR (6)
R2: (1 sc, inc) x 3 (9)
R3: (2 sc, inc) x 3 (12)
R4–R7: 12 sc
R8: (2 sc, dec) x 3 (9)
Fold the piece in half and crochet 4 sc through both layers. Leave yarn for sewing.
Arms and Tail
The arms and tail of the dog are crocheted as a narrow cord.
This technique is often used for straps and edging and creates a neat, rounded shape, making it ideal for small details such as paws and tail.
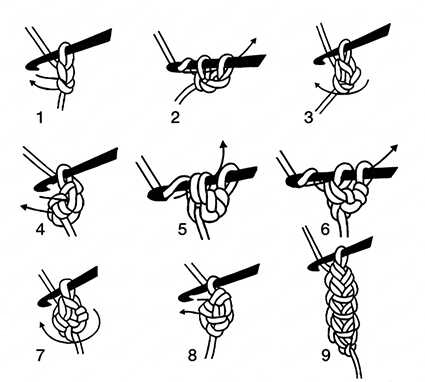
1. Ch 3.
2. Insert the hook into the first chain stitch and pull up the working loop.
3. Work 1 sc.
4. Turn the work clockwise.
5. Insert the hook (with the working loop on it) under the two strands.
6. Pull up a loop as shown in the diagram and work the second sc.
7. Turn the piece clockwise again.
8. Insert the hook under the two strands on the side (edge) of the crocheted piece and repeat the steps above.
9. Continue crocheting the cord to the desired length for the arms and tail.
Assembly
Sew all parts together, embroider the face, attach the eyes, and you will get a cute souvenir.
Copyright & Credits
This pattern is for personal use only. Publication or sharing of this pattern is allowed only with credit to the original designer, Yuliya Kovaleva. Happy crocheting and thank you for respecting the designer’s work.